We are out of stock on both the Hand Mills and Kettles for a little while. Our stock of TCA-2 is also low so first come first served.
We have more on the way. To be on the notification list, email barismo.

Showing posts with label gear. Show all posts
Showing posts with label gear. Show all posts
Saturday, December 06, 2008
Thursday, November 27, 2008
The Cloth Filter
Thanksgiving is almost over. I have to get back on the till and get some roasts done. It's gong to be a busy week next week.
That reminds me, we have some new gear in shop and I am putting it together as a pack. I would throw in the Pour Over Kettles as one big pack but our stock is low so first come first served until next shipment.

In the pack are a Cone Pour Over, a Cloth Stitched Pour Over Filter, and a pack of paper filters.
The Cloth filter is a touchy subject. A lot of people have gotten bad impressions on these simply because you need to care for them. If you dry them and re-wet constantly, you will stress the fabric. Trick is as Hario recommends, to rinse with hot water thoroughly and then store still wet in a zip lock bag in your refrigerator.
I find that this is a bit more work but it's worth it. While many people hate paper, they often go straight to gold filters. The problems with paper besides the taste is the way it restricts fines while absorbing oils. The gold filters just let sediment through which is a big problem. The cloth filter though has depth filtration. Fines are captured evenly in the layers of the fabric and you get a cleaner and smoother cup profile.
This particular Cloth Filter is stitched with measurements which makes it unique. You can use these as a guide for your pouring volumes as the coffee blooms. The cone shape adds depth to the brew cake making this style more ideal for a fan of pour overs.
Thursday, October 23, 2008
It's cold!
The weather is turning a bit chilly here. It's a good time to try some new coffees.
If you are still looking for a good hand mill or a pour over kettle, look right here. We have ice brewers and other unique items coming later, so keep an eye out.
As for coffees, the Kiandu is really good right now for those of you who like a balanced light roast with deep dark berry notes. We are still working on the Guatemala coffees that arrived but the Nimac Kapeh is available now. It's red fruit and distinctly Oolong character is really unique. The other Atitlan will be available later next week but it will be roasted only as an espresso. More coffees later...
Sunday, September 21, 2008
The Syphon Primer Companion
Forward: With Syphon brewing becoming tragically hip lately, we decided to go back and do a comprehensive look at our development in this Simon Hsieh inspired methodology for the Hario TCA-2 and how it has expanded in our community.
We started getting deep into Syphon more than a year ago. It was when we had access to some of Simon Hsieh's coffee and were inspired to understand more that we became serious. We adopted his methods off his blog and began an exchange with him about coffee and brewing in general that has really shaped our current direction away from where our community was headed (see Clover) at the time. We quickly adapted as much as we could understand and began quantifying the methods. We spent time evaluating why each step was important in the brewing process and where could we go with it. We attempted a basic video that got solid feedback and that was the beginning of a series of steps focused around Syphon brewing and demos.
We did demos here in town for small groups, traveled out west for a friend's Jam, and shared the methodology with others who were interested. Which brought us back to the beginning when Simon Hsieh visited us in the US. Some hands on technique was applied and some extra movements were removed to simplify and refine our brewing method. A few autographed copies of his book for good measure and a Syphon demo event topped the visit.
Fast forward to the future and you see competing methods being posted on other sites and more discussion about this old school method but more to the point, three of the six USBC finalists use a version of our preferred method!
So as we are moving on to new subjects we decided to compile a comprehensive primer and updated video people can use based on our experience. This is especially relevant as we now have the TCA-2 for sale at the brick and mortar shop. Enjoy~
The Complete Syphon Primer
Barismo Syphon Primer Demo
Monday, August 25, 2008
Grinder timer modification
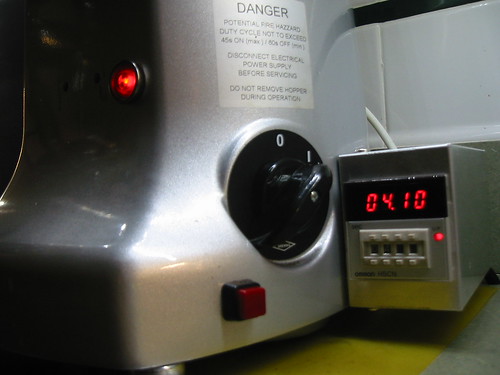
Omron timer (00.01~99.99 seconds), ebay
Aluminum project box, RadioShack
Momentary pushbutton, RadioShack
Reducing coffee waste and able to grind on push of a button, priceless...
Monday, August 04, 2008
barismo coffee: notes
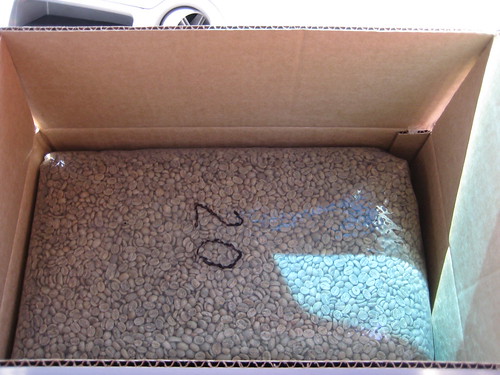
I saw this photo and it reminded me to take a moment and breathe. This is a photo of some of the first Guatemalan coffees to exit Guatemala in something other than jute. We are proud to have a hand in that process and look forward to seeing more lots exit the country that way. Guatemala is such a great place for good coffees. I am told the 18th of this month, our premium Kenyan coffee arrives which is also vacuum sealed at origin. We were lucky on this one because someone else already established the demand. We were all set to have our pick flown in at what is a pretty high cost until we found out vacuum packaging was ready and of course we jumped on it.
People talk a lot about quality but if you really look at the handful of people who have pushed progressive packing, that set the bar for me. Anyone can fawn over 2 buck chuck or overpay for the right to have paid the most but I respect those who put the money into preserving the coffee. How much of that proverbial 90pt+ coffee faded on the boat over bagged in jute? Who is legit if they ignore that, stuff the green in a hot and humid warehouse, then pitch you a romantic story? There is a lot of showmanship and you have to dig deeper to feel out what's behind the bravado.
This is a fun week. Profiling and working on the big roasters. Waiting for coffees to arrive. I owe a lot to Simon Hsieh for giving us a starting point to work from. I don't disrespect the influence he has had among others.
Roasting is complicated. Imagine working three variables: drum speed, air flow, BTU(heat). Now imagine you had no base, how long would it take you to find the right drum speeds, air settings, and gas settings for one coffee? If you apply true scientific method(which almost no professional roasters do), you would only change one variable at a time and test each single variable independently.
Tedious.
Take a basic profile and then test variations with a scientific process and you can progress very quickly gathering a mountain of data quickly.
We have a special roaster which was a great burden but I really believe it will be something great. It is a 4 kilo called a direct flame but it's really a hybrid. The drum is solid cast iron with a couple thousand holes drilled in it so it's not the mesh of traditional direct flame drums. This overcomes a lot of issues in the roast inherent in traditional direct flame roasters. The profile is a combination of an air roaster with a solid drum slash direct flame. You can get explosive aroma, deep sweetness, and the acidity can be decidedly candied instead of sparkling or the more common sharpness. The air flow is amazing and patented by the way. I won't post photos but the mfg developed a manner to make the airflow fairly linear. It operates, in essence, like a camera aperture. Gone are the dorky damper style flaps which are often limited to open, half, or closed where one quarter may not really mean one quarter. The custom air flow has 10 settings of which I use about 5 during a normal roast.
Other specs: variable drum speed, gas gauge, digital bean probe with measurement to one tenth of a degree(can be ported and data logged), and an analog probe in the exhaust. All of those components are controlled on a box that is located about chest high which beats bending over to adjust/log or having a stand with cords you can trip over. The flame pilot and lighting sequence is absolutely b-spec, automated with a flame sensor, timed lighting sequence, and the gas valve has an auto shutoff sequence when it reaches the over temp alarm. The kicker is an external chaff collector which is massive and completely unheard of for a roaster this size.
There were definitely some growing pains but thankfully I had been working the baby version of this, affectionately called the Mini, for half a year previous. The profile scaled up very well so it only took a dozen roasts to get comfortable. Though, honestly, I don't think we will ever stop long enough to really get comfortable so it's all relative.
All I can say is that for the first time in months, I had one of those moments the other day where I was smiling and goofy instead of deep in problem solving mode. It's a good feeling.
Thursday, June 26, 2008
Mis-understood drip
 Drip Coffee, photo by Ben Kaminksy
I have to admit that we too had our own bias against drip a while back. From our earlier experiences, the drip cup profile just did not have the intensity and flavor that a Syphon or Espresso profile possessed. It was not until we started to dabble in manual pour technique and have a better understanding of the roasting process that we finally understood the potential and power in drip coffee.
Just like ANY other coffee brewing techniques, when tuned with proper dose, temperature, time and roast, a cup of drip coffee can be just as flavorful, intense and satisfying as a vacpot cup. In fact, at a recent home gathering, a coffee drinking friend told me the cup of drip I prepared for him is nearly as intense and flavorful as a shot of espresso.
The following is my drip brewing technique. This method is based on the one presented in Simon Hsieh's book with my tweaks to tune for my machine/coffee/roasts.
The gears:
- Presto Scandinavian with modified shower head
- Mazzer Kony
- Melitta #4 filter - white (note 1)
Parameters:
- Use 10~14g per 6oz of water. Adjust if the cup is too intense for you...
- A fine grind (10~15 small notches from espresso on Mazzer SJ, 18~21 notches from true zero on Rocky).
 Grind Setting, photo by Ben Kaminksy
1. Fill the machine with approximately 8oz of water. Start the machine without coffee/filter in it. This preheats the machine.
2. Grind coffee while the machine pre-heats.
3. As soon as the machine is done pre-heating, place coffee in the basket, level the grinds (note 2), and start brewing immediately (before the machine cools down).
4. Turn the machine OFF after about 20 seconds. For me, this is about 3 "gurgles". The purpose of this is to pre-infuse the coffee and allow all the grinds to be saturated(bloom) before starting the remaining extraction. You will have to experiment with the timing of this cut-off - just pull the basket out to see if all the grinds are properly wet at various time.
 Pre-infusion, photo by Ben Kaminksy
5. Turn the machine back on after 20 seconds of wait time(the end of pre-infusion).
6. Complete the brew within 3~4 minutes if possible. Play with the dose to find out the optimum capacity of your machine. For my Presto, the upper limit is at around the 5 cup mark.
7. Remove the carafe immediate after brewing and serve.
 Spent ground, photo by Ben Kaminksy
That is it. With a little bit of care, this simple method can produce just as good of a cup as with most other brew methods!
 Cup of Drip, photo by Ben Kaminksy
note 1: I like Melitta filters because the small holes in the paper seem to allow a bit more oil to pass thru; not as much as a cloth filter but is better than any paper filter I've used. To me, the natural/brown paper filters are quite foul and imparts a very strong brown paper bag taste to any liquid that passes thru. If you insist on using it, please rinse it with some hot water first to reduce as much of the off flavor as possible. And for those of you who just have to use a gold/metal filter, please be aware that your brew time will be altered due to the different flow rate. It will flow a bit faster than the paper filter and will most likely require a even finer grind setting to achieve the same dwell time (which puts even more sludge to the cup... hmmm... gritty...).
note 2: Simon advocates shaping the coffee mound in the basket to match that of the shower head - putting divots where the exit holes are located (imagine using the shower head to make an indention on the coffee mound). Since I have modified my shower head to have near full coverage, it does not make much of a difference for me. For those machines with limited water exit holes, try Simon's recommendation to see if it makes a difference.
Wednesday, June 18, 2008
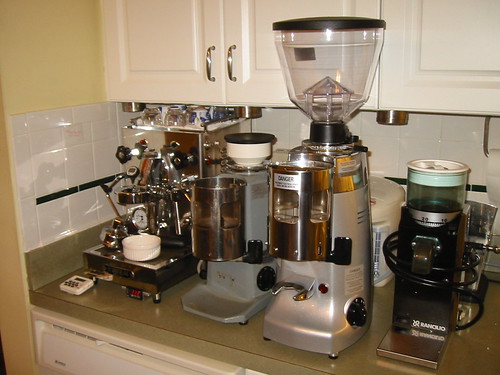
About a machine
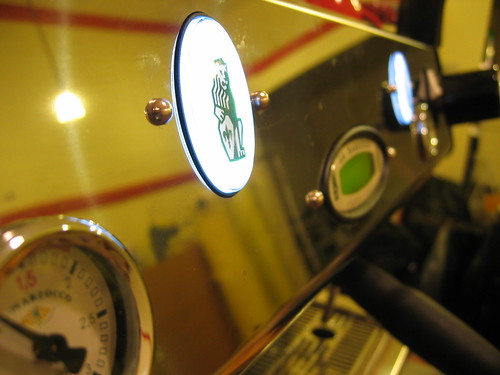
I love having a good lab machine. Ours is a GB5 and it is really giving me a go around. Being able to dial in different temps and work different extractions with nominal turnaround time between roats is a blessing.
Having started on an old Rancilio and some burnt out SM90s with some pretty questionable training if you could call it that (sorry Angry Andy), I appreciate this newer equipment. That was several years ago and I am not interested in going back or ever working with those who insist on keeping the dirty dull blades and uncontrolled HX machines in service. That shop now has an FB80 and some Majors, so it's safe to say things have changed.
Looking forward though, there is something we were aware of for some time. The equipment has caught up with our needs and no longer presents an issue or in the very least, the obstacle it once was.
That brings us to a new stage for a section of the community where there is some change happening. The move to manual methods. It can either be seen as a reaction to Clover now being unavailable or it could be a new focus for our endless tinkering and fidgety energy. The perpetual modding of our machines has come to the realization that the equipment exists in (nearly) finished form for the right price. A gicleur. a few new baskets, nice tamper, solid grinder, and go. That leaves us to spend some time practicing our pourover method and tweaking our syphon skills. A return to the simple art of manual method for a community so fascinated on technical mods and hacks.
I'm not really endorsing this movement but merely acknowleding it as a cranky forebearer. For long enough, the focus has been everything but the cup character with the misleading sermon on 'letting the coffee speak for itself.'
Self indulgence. Beautiful and incredibly fun, but indulgence still. Dog and pony shows where barista behave like ego driven rock stars and the coffees are accredited to the counter on which served and not the farm which bore them.
It is perhaps best expressed in the simple irony of how we obtained our site moniker back in the day when we had a more ideaoligical tint in coffee. Being criticized for being overly technical barista in a multi page diatribe by a famous figurehead of the coffee cognisceti where he offered this term up to put us down. It stuck and yet we are reinventing it as we go.
It is great having a wonderful beast of a machine that can jump through flaming hoops (figuratively) but the real beauty is that it helps take one more piece out of the equation towards better coffee. That just means more work on the coffee itself and less time alloted for excuses about the equipment.
Wednesday, February 20, 2008
Aaarggh!

One too big, one too small, another set just a bit smaller... just right happens to be maybe a 10th of a mm difference off in between that.... maybe.
It's like a bad case of Goldilocks and the three bears meets barismo and the sample roaster.
Tuesday, February 19, 2008
Goodbye Jolly~~ Heeeello Kony!
A devil named Simon made me do it...=p
This grinder is DEFINITELY not home friendly. Notable different cup profile (compared to the Jolly) with the limited test session we had tonight. Distinctly lack of bitters and reduced mid-tone. More test is needed.
Monday, December 03, 2007
Espresso: The delay timer hack
We go through a lot of nonsense for a good espresso. Sometimes I wonder if it's worth it... sometimes.

photo originally uploaded by hazelsheard.
photo originally uploaded by hazelsheard.
Simon's Coffee Shop has been working with a delay timer on the machine for the last few weeks. The basic setup involves a flow regulator and an adjustable delay timer that controls when the rotary pump kicks in.
The idea is that you use the flow regulator to control line pressure during a 'pre-infusion' where the pump does not kick in yet. To set it up, you adjust your line pressure to get your first drip at a desired time.
Let's say in this case, 5 seconds. Then you setup your timer to kick in at that same 5 second mark and your pstat will swing up to 9 bars at that point from your line pressure of say, 4 bars. This involves a lot of grind tweaking and adjustment during the early stages and graphing it would be weird so don't ask.
You then go through a series of adjustments testing from 3 seconds on up to 10 seconds to find the right balance for your espresso(assuming a fixed dose/extraction volume... at least temporarily). It helps to have an ideal batch of roasts lying around or work with it over a week or two instead of trying to coffee out and fix it in one night.
The original idea we had was that we could imitate the Synesso's style of pre-infusion where the pump kicks in at your manual control. Often overlooked on a Synesso, you can soak the puck with line pressure by moving the paddle to the middle position and then let pump pressure start when the paddle is moved to the full on position. The delay timer/flow regulator setup is meant to imitate this in an automated manner.
It's a hack. Don't get me wrong, I don't profess anyone should install this setup on their machine unless they know what they are getting into. For the price though, it gives you an almost lab style setup to make adjustments and we should credit whoever we originally took the idea from but I can't remember who we stole it from. Of course, a local tea guy is now treating it like the greatest thing since sliced bread and intends to push this as a solution to consistency(user/roaster) ills involving espresso at a small profit, of course. He thinks it will take out the variation in espresso.
It's not a cure all and in all honesty, if the roast has wild variations, homogenizing the brew method is only hack compensating. If people don't have the fundamentals in preparing espresso and clean grinders with new blades, none of this is worth even debating. That said, everything in espresso starts with the roast. In Simon's case, he is using a prolonged(close to 9 seconds) pre-infusion to build mid tones and smooth a roast that had very little mid tone on the cupping table. He's also using a low brew temp to mellow sharp acidity into something more approachable to the general espresso drinker's palate.
Simon isn't trying to reinvent espresso or try to force a new perspective on espresso that everyone else 'should follow.' The result is a very approachable but not super complex espresso that fits his personal palate. While roasted for high tones and lemon acidity, this Brasil comes out mellow, clean, and smooth nuttiness with hints of cocoa after all the tweaks. I think that's a great thing when the espresso matches up to the owners personal palate very well.
I find it educational and a lot of fun to muck around with experiments like this. Realisticaly, a newer machine likely would negate the need for such modifications. A Synesso, FB series LM, or GB5 completely negates this setup since the pre-infusion is built in already. Most heat exchangers have a mechanical preinfusion built in and won't work with this either but a machine like older LM Lineas could be modded with this setup just for curiosities.
UPDATE:
A few more changes since and the shots for Simon are now a very low line pressure with a 7 second timer delay at 196F 17g. If I implied that you absolutely had to sync first drip with pressure kicking in, you don't.
Thursday, October 04, 2007
Hand pour drip method
Saw this on saueshen's blog. Once again reconfirmed for me that we don't know squat about manual methods...(and why there were competitions for these sort of things...).
Friday, September 28, 2007
"Barismo Spec" EC/EP Hybrid Tamp - LTD LMWDP Version

"Barismo Spec" EC/EP Hybrid Tamp - LTD LMWDP Version - 3" Tall Handle & Brass Bezel
Now available to the public through EPNW
From Espresso Parts: "Well they say great minds think a like... I don't know if we qualify but the Barismo guys have a great mind for coffee and espresso alike.
First and foremost, what is the "B-Spec" or "Barismo Spec" Tamper? Well currently our version of the "Barismo Spec" Tamper is an matte finished Espressocraft tamp handle and custom brass bezel mod'd to fit the classic Espresso Parts height convex piston."
Having been lucky enough to participate in the HB tamper road show (thanks to Dan and others who helped organize) and get a feel of several prominent tampers, we did a review. After analyzing them, there was not a clear winner. There were handles that were nice and a base that worked but there was a lack of the complete package. Take into consideration that we were thinking of a cafe prototype rather than a home user tamp and you can understand some of the choices made as Ben C. put together the mod. Our first evolution arrived and we had a pretty comfy if not absolutely gorgeous tamper.
 There was a lot of discussion about the piston height and we had a strong interest in having pistons that came level with the basket if the dose was correct which came to a satisfying conclusion. One more piece in consistency relative to our espresso OCD solved. After some mucking around and grabbing a few early versions of B-Spec from ESPNW, one more mod was added to really put it over the top. Ben decided on a sand blasted matte finish that added a comfy feel to the grip. We highly recommend you also get the EspressoParts S.S. 58mm convex base machined to a "c-flat" hybrid shape then mirror polished if you want to be hardcore and follow Ben's B-Specs.
Saturday, September 08, 2007
Saturday, July 14, 2007
Huky Motor Replacement (aka "Let the Good Times Roll")
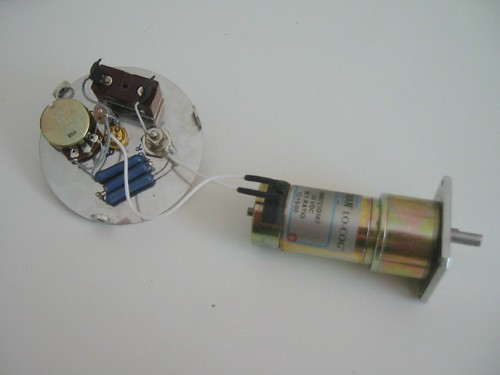
Based on the feedback of my recent roasts, I am convinced that the increased rpm (from 43 to 52) contributed positively. The roasts are more even and the heat transfer efficiency increased. The roaster response also increased slightly as the result of the higher rotation speed.
The next step in this experiment is to replace the stock motor with a higher rpm one and install a motor speed controller so the rotation speed can be profiled throughout the roast. After watching ebay for several weeks, I finally found a unit with the right rpm and torque that is affordable as well. I quickly snatched up the motor and eagerly waited for its arrival.
Here's a quick comparison of the new and stock motors (running at 24 VDC):
Stock motor:
Manufacturer: Shayang Ye Industrial Co.
Model#: RB400150-06202
Reduction ratio: 100:1
Rated speed: 54rpm
Rated torque: 6.1 lbf-in (97.2 oz-in)
New motor:
Manufacturer: Pittman
Model#: GM8723G567
Reduction ratio: 96:1
Rated speed: 86.5rpm
Rated continuous torque: 7.1 lbf-in (113.3 oz-in)
The new motor is a much heftier unit and the construction is very solid. It is also not cheap if purchased new. The NOS unit I got is very reasonably priced. As usual, trimming and fitting are necessary to get it go into existing housing. The current coupling sleeve was drilled to accept the circular shaft. I was initially concerned about slippage and mis-alignment, but so far it seemed to be fine.
I had originally planned to purchased a PWM (pulsed width modulation) motor control unit from ebay but after conversation with a very generous co-worker (Dr. Gizmo), he designed/installed a analog motor speed control for me. Below is his schematic of the circuit:
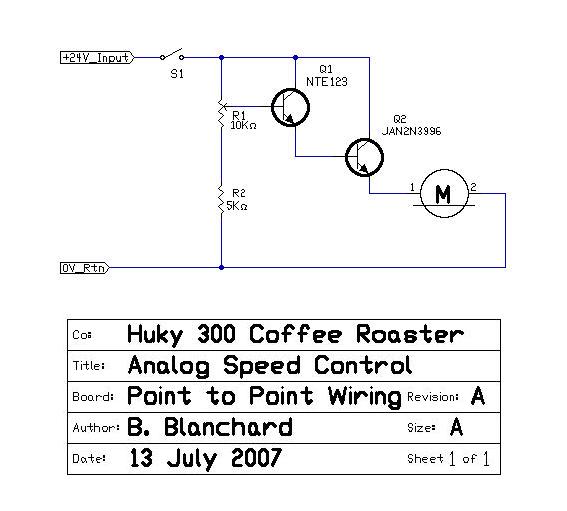 The new motor/controller setup allows me to vary the speed from 20 to 80 rpm. At speed below 20rpm, the tachometer no longer register the speed and I do not think such low speed is necessary. The maximum rpm dropped from 83 to 80 due to the voltage drop at the transistors. Noted that in actual use, the rpm will go up 1 to 2 more when the roaster is fully warmed up.
This latest mod puts the little huky a step closer to a "commercial" sample roaster that I desired. I am very excited to start experimenting with speed profiling and anxious to see if it can solve one of the remaining deficiencies of the roaster.
Tuesday, May 29, 2007
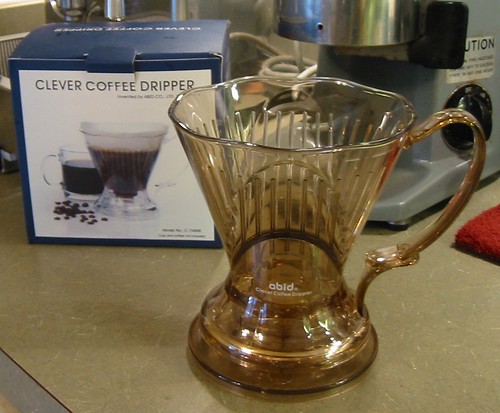
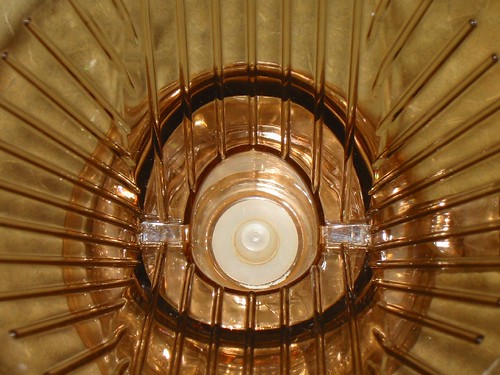
Abid "clever" coffee dripper
Other than vacpot (aka syphon), hand pour is another very popular coffee preparation method in Asia. In fact, it is the preferred method for non-espresso brewing method in Japan.
I've been wanting to try out this method for quite some time as I was told it made a different cup profile than vacpot. However, I never follow thru as I am intimidated by the various methodology and tools it required. I was also told it is a very technique-dependant method and can be quite inconsistent from operator to operator.
I first notice this little coffee gadget from mojocoffee's website. I was intrigued by its simplicity and promised ease of use. It's basically a pour-over cone with a stopper valve - you get the cleanness of the drip cone with full extraction of a french press. Best of all, it is stupid simple to use, very consistent, and takes less than 2 min from brewing to clean-up.
I made a request with my brother who is currently vacationing in Taiwan, and couple weeks later I got the unit delivered to my door.
Upon opening, I was quite impressed with the packaging. The graphic design is very well done (no "AS SEEN ON TV" style packaging here). Coupled with the high quality plastic (medical grade imported from Japan), it really made the unit felt substantial.
The design of the unit is very simple. It is basically a drip cone with a tiny plunger at the bottom of the unit. The plunger is connected to a plastic disk/ring. When the dripper is placed on its legs, the plunger will sealed the drip hole due to the weight of the plastic disk. When placed on top of a cup, the rim will push the disk up, lifting the plunger, and allow coffee to pass thru. The concept is so simple yet it worked so well.
The brewing procedure are as followed:
1. Place paper filter in the cone. If desired, run some hot water thru to "wash" away paper taste.
2. Add coffee to the dripper. I use 32g per a full dripper brew (~ 12oz, ending w/ ~ 8oz of coffee).
3. Add hot water (198~202F, depends on the coffee) to the dripper. Make sure the grinds are well agitated. Stir if necessary.
4. Wait 1 min. Stir to break-up the crust.
5. Place the dripper on top of cup and let it drain. The drip time is roughly 60~90 seconds depending on the grind fineness.
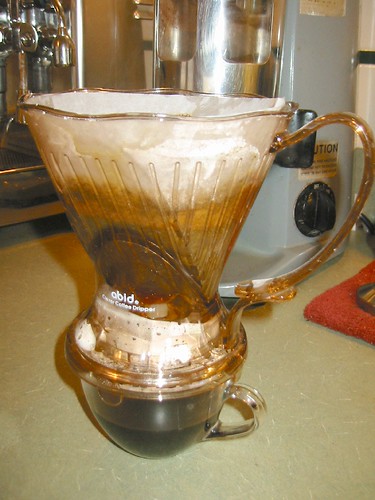
That is it. Clean up involved tossing away the paper filter and rinse the dripper. You get a cup that is aromatic, full flavored, and clean with a total dwell time of roughly 2 min (+ 60-90seconds of drain time).
"Clever" coffee dripper is clever indeed.
- Ben C.
Saturday, April 21, 2007
So you want a Barismo Spec Tamper?

photo courtesy of Gabe Rodriguez
We got some emails inquiring about our tamper and the guys at Espresso Parts are delivering a version of it. Our current version features a sand-blasted handle (for better grip) and a subtle c-flat base along with the polished brass ring. Weighing in over 2 lbs, this stainless steel tamper is a beautiful and an efficient piece of equipment.
If you have any interest, please email the Espresso Parts guys and ask for it by name. We saw the first version of it at the Bellingham jam and we are excited to get some feedback about it.
Tuesday, March 06, 2007
AeroPress Revisited
Long time readers of the blog (if such things exist) might recalled that we've reviewed the famed AeroPress way back then.
Using it in the stock configuration and mimicking brewing parameters of a clover (time, temperature, grind dosage and coarseness), the aeropress produces a cup that is cleaner, yet inferior to a french press cup.
The problem has to do with uneven extraction due to seep thru that occurred as soon as you pour water thru the grinds. Using it in the inverted manner, the cup improves a bit as it allowed the coffee to extract more evenly at desirable temperature.
Despite improvements with the inverted method, the resulting cup is still inferior to a regular french press cup in both aroma and flavor; the stock paper filter, while capable of producing a very clean up, simply absorbed too much of the oil and aromatics.
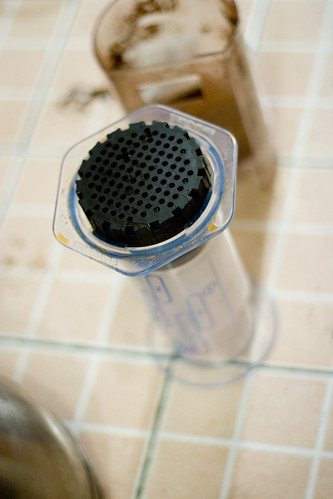
Photo Courtesy of Gabe Rodriguez
Several weeks passed and the buzz with AeroPress continued on CG. I noticed a new development with the inverted method. The stock paper filter is replaced with a polyester felt round that allows much of the aromatics and the oils to pass thru. A couple of email exchanges with Scott yielded a generous offer of samples of these poly-felt rounds for me to play with.
Following Scott's instructions, I was able to produce cups that retained the flavor and aroma, while being much cleaner than the french press. Using brewing parameters similar to a clover brew, the cup comes surprisingly close according to Jaime, and is sweeter than the french press cups. We concluded that, while being a bit clumsy and messy, this configuration (inverted + poly-felt) produces a satisfying cup that is good enough of a reason to keep this device in our array of coffee brewing apparatus.
However, after my recent visit to Taiwan, things changed a bit.
A vac pot is what I use, almost exclusively, for "brew coffee" now. The vac pot has all the advantages of my coffee brewing devices: near constant brewing temperatures, adjustable brew temperature and time, as well as a cake filtration that produces a very clean cup.
Upon learning the proper method and brewing parameters of the vac pot, I was able to produce cups that are the cleanest, most complex, and most aromatic among the three brewing methods. It also produces cups that have a long and lingering tail that stays in your mouth well after consumption. The brewing/clean-up is not much worse than the inverted poly-felt aeropress and it takes less than 5 min from grind to clean-up. The total cost of the setup is also comparable to the AeroPress.
Unfortunately, I am not aware of any US retailer selling the 2 cup version of the Hario Vac Pot. The larger vac pot units are not very desirable as you need to brew it at capacity in order to have a proper extraction. In fact, I had a 5 cup unit that I ended up gifting away due to that (there is no way in hell I can drink that much coffee without getting caffeine sickness).
Using it in the stock configuration and mimicking brewing parameters of a clover (time, temperature, grind dosage and coarseness), the aeropress produces a cup that is cleaner, yet inferior to a french press cup.
The problem has to do with uneven extraction due to seep thru that occurred as soon as you pour water thru the grinds. Using it in the inverted manner, the cup improves a bit as it allowed the coffee to extract more evenly at desirable temperature.
Despite improvements with the inverted method, the resulting cup is still inferior to a regular french press cup in both aroma and flavor; the stock paper filter, while capable of producing a very clean up, simply absorbed too much of the oil and aromatics.
Photo Courtesy of Gabe Rodriguez
Several weeks passed and the buzz with AeroPress continued on CG. I noticed a new development with the inverted method. The stock paper filter is replaced with a polyester felt round that allows much of the aromatics and the oils to pass thru. A couple of email exchanges with Scott yielded a generous offer of samples of these poly-felt rounds for me to play with.
Following Scott's instructions, I was able to produce cups that retained the flavor and aroma, while being much cleaner than the french press. Using brewing parameters similar to a clover brew, the cup comes surprisingly close according to Jaime, and is sweeter than the french press cups. We concluded that, while being a bit clumsy and messy, this configuration (inverted + poly-felt) produces a satisfying cup that is good enough of a reason to keep this device in our array of coffee brewing apparatus.
However, after my recent visit to Taiwan, things changed a bit.
A vac pot is what I use, almost exclusively, for "brew coffee" now. The vac pot has all the advantages of my coffee brewing devices: near constant brewing temperatures, adjustable brew temperature and time, as well as a cake filtration that produces a very clean cup.
Upon learning the proper method and brewing parameters of the vac pot, I was able to produce cups that are the cleanest, most complex, and most aromatic among the three brewing methods. It also produces cups that have a long and lingering tail that stays in your mouth well after consumption. The brewing/clean-up is not much worse than the inverted poly-felt aeropress and it takes less than 5 min from grind to clean-up. The total cost of the setup is also comparable to the AeroPress.
Unfortunately, I am not aware of any US retailer selling the 2 cup version of the Hario Vac Pot. The larger vac pot units are not very desirable as you need to brew it at capacity in order to have a proper extraction. In fact, I had a 5 cup unit that I ended up gifting away due to that (there is no way in hell I can drink that much coffee without getting caffeine sickness).
Friday, February 09, 2007
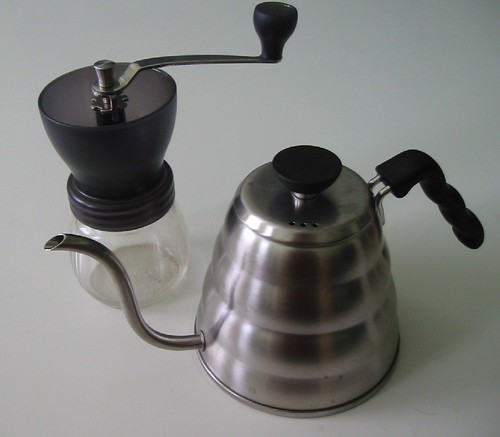
New Toy

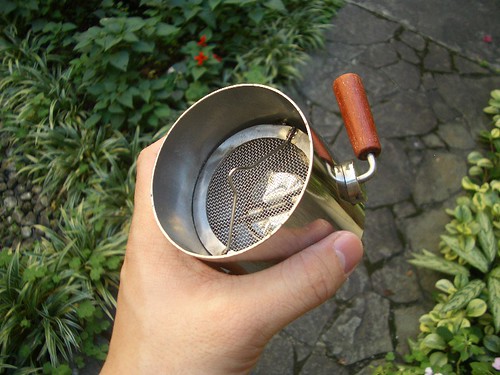
Huky300 Coffee Roaster
Capacity: 100~360g (3.5~12.7oz), 250g (8.8oz) recommended (limited by cooling)
Size: 16" x 7.5" x 14" (L x W x H)
Weight: 13 lbs
Mirror Polished 304 Stainless Steel


Perforated Stainless Steel Drum with dual agitator vanes (4.7" diameter x ~0.1" thick)
50rpm-24VDC motor (running @ 20VDC -40rpm)

Custom machined stainless steel axial/bearing (vacuum heat treated)
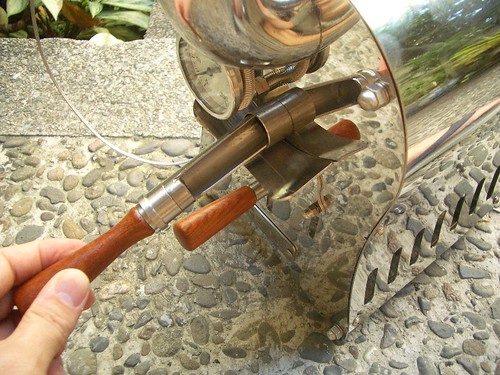
Bean sampler and quick release gate
Solid rosewood handle
Dual temperature probe: type-K thermocouple and analog
Exhaust vent with gate valve and chaff collector
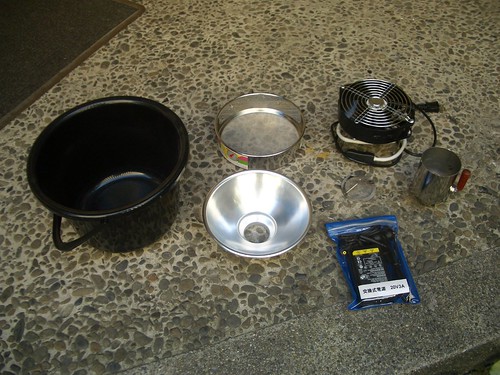
Accessories: Storage bucket, cooling basket, cooling/exhaust fan, DC power supply, bean funnel (hand made)
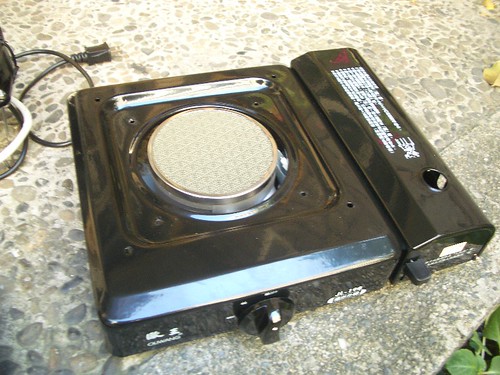
High-output Portable Butane Gas Stove with ceramic element (for infrared heat)
Just about every single piece on this roaster is hand made due to the limited production number. Everything is made to last at very high fit and finish (the thing is almost entirely of stainless). The craftsmanship is amazing.
I've done two roasts with it and it's not an easy roaster to use due to its all manual nature. I never use a direct flame drum roaster, let alone one that has air-flow control. The bean probe is very accurate and the thick gauge steel drum is able to retain heat once up to temperature. There are much to learn from this setup but I believe it will teach me more than any currently available home roasters (sample roaster does not count...).
- Ben C.
Friday, January 05, 2007
Espresso Tamper: Barismo Spec
 Handle: EspressoCraft 3.50"
Base: Old stock EspressoParts S.S. 58mm convex
Modifications:
- Custom machined brass collar ring
- Base machined to "c-flat" hybrid shape
- Mirror polished base bottom surface
note: The new stock EPNW base are now 1/8" thinner. It's much lighter and does not have sufficient height to be used as dose/level indicator. No reponse from EPNW on old stock availability.
- Ben
Subscribe to:
Comments (Atom)