Featured Post

Pour'd fonts and way back when we worked on Luminaire, Toast, and others

Most coffee people may not have heard of the  Luminaire hot water font unless you were around back in the day. It was a project that some g...

Showing posts with label hand pour. Show all posts

Monday, December 05, 2011

Pour over cheat sheet

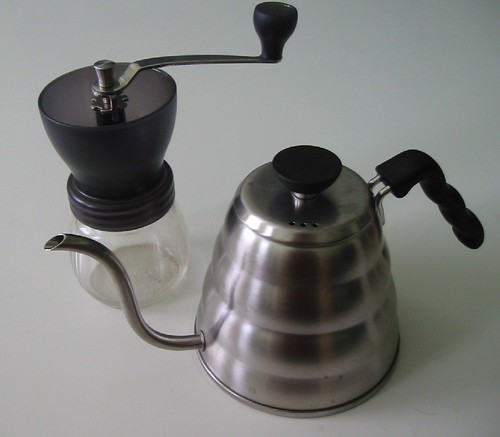
Here’s a quick cheat sheet to help you get the most out of your home Hario V60 and Buono kettle set-up.

Before you pour:

1) Temperature: After your water is done heating, make sure it is the correct temperature. All of our coffees have a recommended brewing temperature on the bottom left side of the front label.

2) Rinse: It’s important to rinse the filter. Doing so helps to get rid of unwanted paper-y tastes and also helps ‘stick’ the filter evenly inside of the V60 Dripper. This also pre-heats your v60 and Linkrange server (or cup). You can do this with the water while it’s cooling down to the ideal brewing temperature. Just don’t forget to toss the water before you brew!

3) Fresh: Grinding fresh should be the last step prior to actual brewing. This and a fresh roast can ensure the freshest cup of coffee possible.

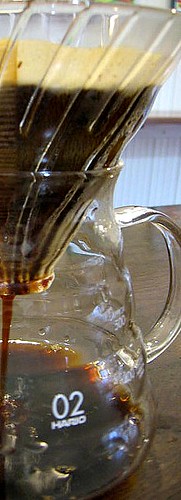
v60-Side view Pre-Infusion:

Place the coffee in the filter and make a small divot in the center of the grounds. Start from the center of the bed of coffee and, in a spiral, work your way to the outside of the V60. At this point, you only want to evenly wet the grounds. Start your timer, and wait 15-20 seconds (or until the bloom stops bubbling and settles). You should see the coffee begin to expand, or bloom, and then settle slightly during this phase.

Brewing:

After the coffee has bloomed, start pouring again from the center of the coffee. Work the stream of water in a spiral evenly toward the outside of the V60. Be careful not to touch the outermost edges of the coffee bed with water. This prevents water from running directly down the side of the V60 without passing through the coffee. Continue to pour evenly spiraling in and out until you have reached the recommended yield (end brew volume) for your V60.

After you have finished brewing, the bed of coffee should look concave as opposed to flat. This is a sign that the coffee was evenly extracted.

Other tips and recommendations:

1) When you are pouring, the water should look like it’s falling from the kettle, almost like a tail. An aggressive pour can result in channeling, and improper extraction. You can place your free hand at the top of the kettle to help control the flow rate. A kettle gicluer helps to control the flow rate even further and is a highly recommended addition to your V60 set-up.

2) If the time for the water to drain from the grounds and enter the range server after your final pour takes longer than 30 seconds, your coffee might be ground too finely. If the water drains through the bed of coffee quickly after the final pour, your flow rate might be too fast and the grind too coarse.

3) A 1 cup v60 takes 2-3 minutes for a brew while a 3 cup takes 3-4 minutes. See our brew guides in our shopping section.
---

The V60 system is one of the most clean and satisfying brew methods around, but it can take many tries to really get it down. As long as you are using the correct temperatures and dose, maintaining an even flow, and distributing the water correctly, in no time you will be making pour-overs that rival some of the finest coffee-bars around. - Steve J.

Tuesday, August 09, 2011

Iced Coffee

There are four basic types of iced coffee that are used and I'll cover them briefly:

(The Boston Globe is about to let loose a big article on iced coffee so here's our take on it!)

Standard iced coffee: Brew a regular drip brew and refrigerate it. It's the easiest way to make cold coffee by far but the least interesting flavor profile. We recommend glass only for storage containers and consume quickly after brewing due to the short shelf life. Flavor profiles are similar to regular hot coffee but thinner, weaker and often less interesting.

Double strength over ice: This can be made with varying portions of coffee to water and some people even add water after brewing. The idea is to brew straight over iced and drink immediately. While it's fresher, in theory it sounds great, but this type of brew shocks over the ice and acidity is stronger while body and texture are lacking. Varying methods of this have been around for as long as drip coffee has been around. In fact, Starbucks recommends this method as their own suggestion for iced coffee so it has wide acceptance for it's ease in preparation. Doing this as a per cup pour over was also recently misreported by the NYTimes as being 'Japanese Iced' method (we should call regular pour overs 'Japanese Hot Coffee' by that example). It is not however a method we particularly find rewarding across the board for all coffees and is by no means the most complex or absolute ice coffee method available. It tends to work better on coffees that are lighter roasted but not for medium or darker roasts.

Cold drip: There are many versions of this worth trying but the most obvious is what persistently is called Kyoto Style Coffee. The complex version relies on a needle valve where room temperature water drips at rates as slow as one drip per second through the grounds. This may takes several hours to drip through. On the larger scale brewed at room temperature, the resulting brew can change radically as it rests and can turn quickly into less pleasant flavors. This slow drip style results in heavy base notes and winey flavors. We have found that brewing at room temperature yields some unpleasant results so we use a variation of this. We've used a simple medium cupping grind loaded into a pour over or Syphon top with filters in place works well with ice in the refrigerator. Loading ice on top of the grounds and keeping the whole process chilled takes several hours longer to brew but can produce a really interesting cup. The key is not having an excessively coarse grind and brewing cold. This allows more origin character to come through and produces excellent coffee. This method works better for medium and darker roasts.

Cold brew: Much like ice drip, there are versions and caveats to this particular full immersion method. The classic version of toddy is to take a bucket of water and load a large cloth bag full of grounds much like steeping tea. This is typically done with french press grind and at room temperature. With such a coarse grind causing so much under-extraction, very few origin characters come through and the dominant flavors are cocoa, toffee, and caramel. This brew can oxidize, sour, or simply turn while being brewed at room temperatures that are hotter than normal so be advised. The sediment that is a byproduct can be quite acrid so storing for any period of time can also have varying results. We actually disavow this method in that the results are often silty, rancid, and lacking in complexity. We choose to use a variation on this we have experimented with extensively that we think is exceptional:

'full immersion' cold brew (aka Reposo Frio)
For this you will need:
Gram Scale
Large Carafe (Glass) or Midzudashi
Burr Grinder with adjustable settings
Bamboo Stirrer or tablespoon
Coffee filter (metal or cloth)
1 liter of clean filtered water
60-80 grams of medium roast whole bean coffee

1. Grind the coffee to a medium grind (cupping grind for professionals). This would be coarser than a drip grind but finer than a french press grind.

2. Load the ground coffee into the carafe.

3. Pour water over the coffee.

4. Stir vigorously.

5. Place in the refrigerator for 18-24 hours.

6. Gently stir the crust of floating coffee and let rest in the fridge again for 20 minutes to let grounds settle.

7. Pour the coffee through a filter. We recommend a cloth filter for the best texture and a pristine sediment free cup. Please ask for cloth care suggestions while in the shop or through email.

This style cold brew has complexity and character with great texture, mouth feel, and body. the key is using cold water and storing cold throughout the process. The choice of coffee is how we tune the flavors we want so you can have fruit, florals, and special character as well so explore the range! The other upside is that it's stable and stores well for several days in glass carafes with lids if cloth filtered. At the resulting strength, it can be diluted with one part water but we recommend drinking it at full strength with smaller portions. A 5oz gibraltar glass with one ice cube being my favorite serving.

Wednesday, December 08, 2010

A little information about potential pour over filters

There are three basic kinds of filter medium wide spread in use in the industry we would like to talk about: Paper, metal, and cloth.

Paper as a filter medium: Everyone always says paper wicks away oils and flavors. What you need to know is that rinsing paper filters help but many paper filters are just going to taste like paper. To really understand this, you need to stop drinking coffees with paper filters for a while and then come back to it. The contrast really makes it clear.
The other thing you need to know is that fines will build up against the walls of the filter (subject to the shape of the filter). Cumulatively, we describe the tastes from paper as thin, brighter, and crisp. Look for paper filters that are less thick and avoid brown filters.

Metal as a filter medium: Metal mediums (much like glass) depend highly on the hole sizes (and their spacing). Amounts of fine particulate are expected to pass through to the resulting cup. The effects in taste notes are simple, regardless of what form factor. This filtration that lets sediment through will have more body, more texture, less clarity, and can result in an over extracted harsh taste in the cool cup (from sediment). The fine particulate should be avoided and compensated for in methodology as much as possible.

Cloth as a filter medium: Cloth is unique and a bit unorthodox these days. It is the only filter medium in common use that has natural depth filtration. The fines will be trapped effectively and oils will pass through resulting in a heavier cup with great clarity. Cloth is hard to care for and can easily impart off flavor notes if not rinsed properly after use, cared for in between uses, and cleaned properly as needed. It also requires a seasoning brew the first time it will be used! That's a lot of work so we often recommend cloth for the diligent or advanced user.

Sidebar: Surface Filtration vs Depth Filtration + Cake Filtration
Surface filtration is where the filter medium keeps all particles, that do not pass through at the surface of the filter, on the surface. Depth filtration allows for particulate to pass through the surface layer and into the depth or layers of the medium. This means that the finest particulate is less likely to build up in a layer on the surface and is captured in that depth.

Cake filtration happens in the brew cake of a pour over (espresso pucks as well). As the grinds settle in a brew cake, the layers of grounds act themselves as a filter. This extra bit of filtration is dependent on two things: depth and agitation. Two good examples of cake filtration are the narrow top chamber of a Syphon and the shallow wide brew puck in a Clover brewer. Unlike a Syphon, the brew chamber design in a Clover has a shallow puck with very little cake filtration. (However, by whisking or strong late agitation, a brew cake will not form and have little to no effect on filtering the resulting brew of a Syphon).

This is why we push for less circular stirring agitation in Abids/Syphons/Clover, less pours around the edge of the brew cake in hand pour, and less aggressive pouring (lower steady flows are better). To achieve more clarity and layers of flavor in the resulting cup, a focus on achieving cake filtration seems essential.

We recommend paper if rinsed well for the every day user, cloth for the advanced or technical focused, metal filters for those who are looking for most ease of use. Cloth is our favorite in shop as it works extremely well for the volume we have. Some time ago while in Japan, I played around with and got a Cafeor (a metal screen filter v60) from Hario which is similar to the K-One (has larger holes spaced differently). We found that it worked reasonably well with it's screen configuration where the screen was only about 60% of the surface area but the sediment was still a problem. We adjusted our method quite a bit to compensate for the sediment and found a coarser grind, longer pre-infusion bloom, and dumping the first drops during pre-infusion helped. The sediment though proved for a often unpleasant cool cup and we much preferred the results we get in Syphon and Cloth hand pours.

Aside from the Cafeor, our trainer and an engineering friend played with the new K-One. Neither liked the results and were caught off guard by the enthusiasm others had when tasting the same cup. Regardless, we are going to play in shop with one tomorrow care of Dylan Evans who is gonna bring it in to give it a full working over. I believe our experiences with the Cafeor will hold true. We've tested everything and choose to stick with the methods we like the most regardless of how difficult or complex they get as long as we can find a way to execute consistently with them on bar.

In the end, choice of filter medium is really about a match of personal taste, patience for details, and ease of use. Try them all and work until you find what you like.

Sunday, November 21, 2010

It's all about the flow (or it should be)

When talking about v60's and most hand pour methods, the discussion always breaks down quickly with vague terminology. The chatter comes back to a simple and sometimes meaningless statement of total water volume (usually in gram weight), total brew time, and relating extraction %. That's the hot thing right now in espresso as well in drip, to look at the yield, not how you got there.

The truth is that how you got there matters a lot more. In fact, it's everything.

Looking at the end result is myopic but it's easy and makes sense because it doesn't require much investment. Developing the whole picture takes more than just looking at a few parts and will continue to escape us until we become more scientific in our methods and less what if in our blog posts. It is however what's trending so we deal with tons of discussions bogged down by vague statements.

Here is a simple premise. What if we threw out the scale and stopped measuring the results and moved to a discussion focused on flow rate, intervals, and then talk about the yields?

I know, crazy stuff.

Instead of talking about 12oz, 3-4min, and yield... we just say 4oz/min to 12oz at x dose = yield. It makes a lot more sense to really talk about flow, but only if the flow is fixed and measurable. A steady flow rate is easier to make this functional than a stop start method because the real problem with stop n start methods is the inability to accurately repeat what was done. The yields vary greatly and lack consistency. It takes an awful lot of artistic skill to eyeball measure a volume of water and pour small amounts of water at intervals with any kind of repeatability.

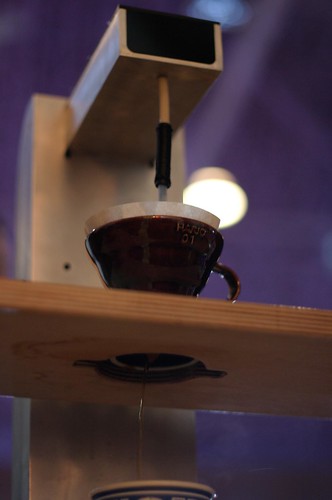
This is the entire case for putting a flow restrictor to a kettle to get a fixed and steady stream. It is also the same premise behind the LuminaireCoffee Lb-1. Instead of incorporating a clunky scale (which you can happily buy for around 20 bucks and add on your own) that would cost another thousand to integrate effectively, they put a precision flow meter inline. That means there is a functional and precise measurement on their display of flow (volume over time). This is incredibly useful and rather intuitive once you get used to seeing it. Having that display also makes for less guess work when trying to dial in a brew.

Take the assumption in the next three cases of a 2 cup paper v60 (more elegant in metric but be patient with the oz/min instead of ml/sec):

Case A: You could conceivably brew your preinfusion at 5oz/min over 15sec with a pause of 25 seconds, then brew for 2 minutes at 6oz/min. Total volume of about 12oz if you assume the preinfusion stayed in the brew cake. Total time would be 2:40 plus the 30 seconds (3:10) it took to drain unless the grind was coarser or finer.

Case B: Alternatively, we could conceive a brew with 5oz per minute over 15sec with a pause of 75 seconds. Then follow with one pour at a flow rate of 12oz/min over 1 min sec. With a draw down assumption of 40 seconds (drawdowns are often longer with more aggressive pouring), we'd have a total volume of 12oz in (3:10).

Case C: Finally, we take a 5oz per minute preinfusion over 15sec with a pause of 30 seconds. Then an off on pour of 12oz/min 4 times for 15 seconds with 3 intervals of 20 seconds. (Doing the math to add that up is as confusing as trying to brew it consistently.) The draw down would be roughly 40 seconds making an overall time of 3:10.

With Case C: Making sure you were precise about the intervals/timing/volumes would take an Lb-1 or ninja kettle skills to be repeatable. Case B is the easiest if you don't have a good kettle, and case A is the one if you have a controlled pour or want the most repeatable (less agitation dependent/easier to get repeatable yields from our experiments). These are just examples and a tweak to grind on each could get the same yield throughout at the sacrifice of some time consistency.

In having a discussion, you see people talking about the starting weights, and the ending times/intervals, but there is no discussion about flow. Why? Because it's hard to measure and hard to control. If you had this in your equation and it was easily measurable, you have a real serious (but complex) discussion. Instead of listening to person in case C talk about a pre-wet and then 12oz pour with 'intervals', you could have a repeatable brew equation that can be tested by others with the same coffee. We can record the resistance of a filter then develop a metric for resistance in the grind and how that is changed by the different flow rates (and resulting agitation). Segmenting each interval and testing it would take time but you could actually have a real discussion about what is going on.

Do it in mL per second and the whole thing becomes quite elegant.

Sadly, espresso machines need this most but current designs have no ability to integrate this. A precision display giving an accurate volume over time which would then make measuring yield very useful. Right now, measuring the gram weight then deriving tds and extraction % of a resulting shot (without a specific incorporation of time and flow) is actually a graph of one variable against a derivative of itself. That is not as useful as it seems more than to calibrate yourself with the same coffee on the same machine with the same water at the same temp with the same grinder to repeat a previous good shot of espresso. That is not how it is being used but much like most things in coffee, we talk a lot about things we aren't always doing ourselves.

Having access to these controls has really hardened my belief that there is so much more exploration to be done and we need to be unbound by things like the gold standard. Sure it is great for a bulk brewing traditional cafe but in our segment, what if there is an amazing cup slightly out of that range? Having a precision range of temperatures and being able to switch temperature mid brew has been devilishly fun to work with but also present a contrast to how most people are still stuck at one temp and a declining or a 'sloped' brew temperature. Having precision and easily adjustable flow rates will be the next thing to really play with on the newest version of the Lb-1 (that will be in production in the spring). When other people get them, we'll compare notes and see how the conversation changes.

Saturday, July 17, 2010

v60 and free pour

One of the key tenets of a quality per cup is repeatability. A big reason we teach our method is because it is highly repeatably with the correct tools and an attention to detail.

What we have found though is that having a few extra tools helps. For the Hario Buono kettles, a flow restrictor can be very useful in getting a steady and consistent pour volume over a fixed period of time. I often find myself cringing at the aggressive pours I see from some other industry people which begs the question, why are they even using a kettle if they are going to pour it in there like that?

On the other end of the spectrum is the new Lb-1 which should come out in the fall. We have been playing in shop with it's dynamic temperature adjustments but also, having the flow controls is an exceptional benefit. Being able to dial in the exact ounces per minute to get the flow rate we want for each brew method and then directing the water where we want it is a tool many would love to have. It makes for a very repeatable brew by guaranteeing the same volume of water always flows through as long as the timing is the same.

That's something lacking from a lot of manual methodologies like consistent volumes of water, not to even get into how few people are focusing on temperature control.

Sunday, December 20, 2009

Pour over videos from Taiwan/Japan

Here's a few collected videos of pour overs to give a broader view what is out there.

The following is a famous very old school Japanese roaster doing his pour over method on TV. His book on coffee roasting and brewing is interesting, techniques on double roasting, dark roasting, and the benefits of aging/aged coffees. About as far from barismo philosophy as you can get so you will understand we are not endorsing this method, it's just interesting to view. I personally think the bit at the end where the hosts get into the brewing is the most entertaining part.


Next up is Jet from Bella Taiwan doing a quick and easy continuous single 1 cup 2 minute brew. It's closer to methods we like to use at the moment on our own coffees for a 1 cup but the timing may be different. Of course, every coffee behaves differently and so do different roast styles so match it to personal taste.

After that is a demo of the stop and go method. We use variations of this for larger 2 and 3 cup brews. It involves pouring a little faster and relies on setting the grind well to control the drainage. I had been using this style for a one cup until I finally got comfortable with the continuous pour.

The last video is the type of method I understand Osir of Taiwan does. It involves a coarse grind, lots of volume, and a rapid continuous pour. This method seems more in line with the old school Japanese methods I have seen but it's not one we use.


So there are some basic pour over ideas to get people started.

Sunday, February 01, 2009

The v60 style pour over

We were playing with some Chemex brews the last few days. Trying to get a bit more out of this brewer as it has become a go to method for a lot of people in the coffee scene outside of our region but initial observations tell us it isn't giving as good a cup as I would like. There are obviously varying degrees of acceptance among our group but I have not been impressed yet with a mix of techniques off that device. It seems to hide a lot of roast note and under develop without getting as nice an aroma as our other more familiar brewers. This could be because we haven't spent enough time with the method but we also had some other observations that made us think this brewer isn't necessarily our style. Given the comparable day to day methods we use for drinking our own cups: Abid full immersion brewer (which is heavier in body but mutes acidity), the v60 style cone pour overs (better aromatics), as well as the cloth pour overs (the best of both worlds when done well but it's hard to do well).

First thoughts in our group were that it has to do with the angles of the smaller Chemex we had. After a round of discussion though, it seems more simple. Ridges.

The method we really enjoy comes from techniques combined between this and this. Where a Chemex brews down through the layers, a v60 style brew has raised ridges that provide space for drainage on the sides, not just out the bottom. This means you have to be a little more detailed in how you pour because you can easily under extract by breaking the ring but it results in a better balanced cup. The tastes come out with more aroma and more nuance in the cloth method particlarly.

The hand made cone here is noteworthy because it is akin to Ben K.'s favorite pour over device, the cloth dripper. It's really simple actually, you pour in a circular motion into the center and the coffee and it extracts evenly through the cake which forms a V if done correctly. Be careful not to break the bloom and it will hold temp better and be more aromatic. Some arm chair quarterbacks have proffered that the open ventilation would somehow cool the brew but I would suggest unless you have brewed it with a temp probe and experienced the resulting cup(we have), it's better to test it than hypothesize. I will post a primer when things settle down but right now we are too busy to do it proper.

This methodical hand pour method is one where you have to really pay attention and it's a contrast to the method I keep seeing of pre-infuse and then fill which is no different really than most approaches to Melitta. I am not sure the kettle is as important to that method but it really does make a difference for that slow controlled pour you need on a v60. It represents a bit more work but the reward is in the cup. Check out this Hario promotional video for a few chuckles and a look at the dripper and v60 in action. We have a case of the nice ceramic v60's coming in to play with soon so keep an eye on the shop for an upcoming demo session.

Thursday, November 27, 2008

The Cloth Filter

Thanksgiving is almost over. I have to get back on the till and get some roasts done. It's gong to be a busy week next week.

That reminds me, we have some new gear in shop and I am putting it together as a pack. I would throw in the Pour Over Kettles as one big pack but our stock is low so first come first served until next shipment.


In the pack are a Cone Pour Over, a Cloth Stitched Pour Over Filter, and a pack of paper filters.

The Cloth filter is a touchy subject. A lot of people have gotten bad impressions on these simply because you need to care for them. If you dry them and re-wet constantly, you will stress the fabric. Trick is as Hario recommends, to rinse with hot water thoroughly and then store still wet in a zip lock bag in your refrigerator.

I find that this is a bit more work but it's worth it. While many people hate paper, they often go straight to gold filters. The problems with paper besides the taste is the way it restricts fines while absorbing oils. The gold filters just let sediment through which is a big problem. The cloth filter though has depth filtration. Fines are captured evenly in the layers of the fabric and you get a cleaner and smoother cup profile.

This particular Cloth Filter is stitched with measurements which makes it unique. You can use these as a guide for your pouring volumes as the coffee blooms. The cone shape adds depth to the brew cake making this style more ideal for a fan of pour overs.

Monday, March 31, 2008

To the next 'golden' brew


87980001, originally uploaded by SIWA COFFEE.

Right now, there is a lot of navel gazing going on in the blogs about what brew methods are best, what to do now that the clamour for Clover turned into the planet buster on the death star....

A lot of people are talking about moving to the manual methods or anything new that's less automated. Siphon, pourover bars, and getting back to basics are becoming the buzz words. I think it's just a movement in trying to find a new niche, the new amazing brewer that will give them the angle. Specializing and definite product differentiation from the big boys. I am proud there are some serious cats out there brewing vac with all the tedium and technical precision of a guitarist mid solo but they are the few among a mob of new found fans of the manual method.

The times are changing and nothing is settled right now. There are no firm standards and we have no clear direction where things will be in the next year. It was not too long ago that I believe we were in the dark ages of coffee on the verge of change. Sure the forums were buzzing and 3wavers were aplenty working for 'the goal', but it was a time with a lot of passion and very little substance. Vac sealing was something only eccentrics did and few would publicly admit how much coffees deteriorate much less think about freezing a coffee.

The focus was on the equipment mods, ritual movements in preparation, and all about these name brand 'black box' blends. The forums were left to the machinations of latte artists proclaiming the value of triple rosettas and pacman blowing flames in your cup AND gratuitous photo series of 'naked' portafilter triple thick one ounce muddy baked 'chocolate' shots. Sure, there was an interesting segment focused on how to hack some cheapy piece of equipment into some better cheapy piece of equipment.... but eventually, you PID your PID and it becomes redundant so you end up buying the best equipment after spending lots of cash on a series of small modded upgrades.

Somewhere along the way, a lot of focus on the actual coffees was lost. Sure, I realize everyone is 'about letting the coffee speak for itself' and other catchy phrases but a little less time on forums talking about the concept and more time living it would help us all.

It's all the more complicated these days by marketing that is geared at direct trade and relationships where the farmer as a brand is glorified on one hand and on the other often then repackaged in mill marks where the farmer disappears again. Transparency is a funny thing we all talk about but don't really ever see or have the access to understand.

Then there are coffees where the placement in contests or prices paid set notoriety and it can simply be a contest to pay the highest price for the right to pay the highest price AND then you have press and buzz based on expensive brewing equipment and 20K utterly superfluous heating elements clouding the picture of what is really good coffee and what is just an expensive lamp making cheap coffee at a high price.

So, if you can clear through the fair trade, organic trade, direct trade, bidding wars, ego trips, pricey brewers, complicated techniques, barista flair, and well, everything but cup taste to well... simply cup taste, that's an amazing moment of clarity.

Things haven't really changed that much but I am thoroughly excited by splintering segments of the industry headed in new directions. The point is, there are great things going on in coffee BUT you have to dig deep and often the people doing the most amazing bits don't spend time cruising coffeed or CG, they are out there doing it. Marketing rarely cuts through to the tiny elements that can help make or break a good coffee.


IMG_3245, originally uploaded by edwinfvh.

Thursday, October 04, 2007

Hand pour drip method


Saw this on saueshen's blog. Once again reconfirmed for me that we don't know squat about manual methods...(and why there were competitions for these sort of things...).