Featured Post

There and back again

My last few posts have covered a lot of ground on the early years and more recent events, but there's a messy middle. I could start this...

Monday, December 12, 2011

Gift Ideas: Classes, coffee, and samplers

Looking for quick gift ideas, try one of January classes:

For something unique, reserve one of our samplers:

Or try one of our newly released coffees:
For orders online (to meet the Holiday rush) please specify in the message at checkout if the items are a gift, if you would like us to waive shipping to pick the items up in store(169 Mass Ave, Arlington, MA), or if you would like to delay shipment to the week before Christmas.

Monday, December 05, 2011

Pour over cheat sheet

Here’s a quick cheat sheet to help you get the most out of your home Hario V60 and Buono kettle set-up.

Before you pour:

1) Temperature: After your water is done heating, make sure it is the correct temperature. All of our coffees have a recommended brewing temperature on the bottom left side of the front label.

2) Rinse: It’s important to rinse the filter. Doing so helps to get rid of unwanted paper-y tastes and also helps ‘stick’ the filter evenly inside of the V60 Dripper. This also pre-heats your v60 and Linkrange server (or cup). You can do this with the water while it’s cooling down to the ideal brewing temperature. Just don’t forget to toss the water before you brew!

3) Fresh: Grinding fresh should be the last step prior to actual brewing. This and a fresh roast can ensure the freshest cup of coffee possible.
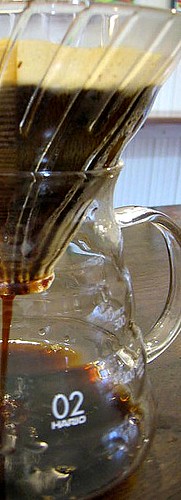
v60-Side view Pre-Infusion:

Place the coffee in the filter and make a small divot in the center of the grounds. Start from the center of the bed of coffee and, in a spiral, work your way to the outside of the V60. At this point, you only want to evenly wet the grounds. Start your timer, and wait 15-20 seconds (or until the bloom stops bubbling and settles). You should see the coffee begin to expand, or bloom, and then settle slightly during this phase.

Brewing:

After the coffee has bloomed, start pouring again from the center of the coffee. Work the stream of water in a spiral evenly toward the outside of the V60. Be careful not to touch the outermost edges of the coffee bed with water. This prevents water from running directly down the side of the V60 without passing through the coffee. Continue to pour evenly spiraling in and out until you have reached the recommended yield (end brew volume) for your V60.

After you have finished brewing, the bed of coffee should look concave as opposed to flat. This is a sign that the coffee was evenly extracted.

Other tips and recommendations:

1) When you are pouring, the water should look like it’s falling from the kettle, almost like a tail. An aggressive pour can result in channeling, and improper extraction. You can place your free hand at the top of the kettle to help control the flow rate. A kettle gicluer helps to control the flow rate even further and is a highly recommended addition to your V60 set-up.

2) If the time for the water to drain from the grounds and enter the range server after your final pour takes longer than 30 seconds, your coffee might be ground too finely. If the water drains through the bed of coffee quickly after the final pour, your flow rate might be too fast and the grind too coarse.

3) A 1 cup v60 takes 2-3 minutes for a brew while a 3 cup takes 3-4 minutes. See our brew guides in our shopping section.
---

The V60 system is one of the most clean and satisfying brew methods around, but it can take many tries to really get it down. As long as you are using the correct temperatures and dose, maintaining an even flow, and distributing the water correctly, in no time you will be making pour-overs that rival some of the finest coffee-bars around. - Steve J.

Sunday, December 04, 2011

Follow barismo on twitter!

Over the coming weeks through Christmas we'll have several offers on twitter, make sure you follow us to catch these limited offerings and specials!

Saturday, December 03, 2011

Cupping without the brand

One of the most powerful exercises in coffee is doing a blind tasting.  We often do this with our coffees and others as well as triangulations (one coffee in each set of three is different and must be identified) in shop.  If you have interviewed for a job, you may have been asked to complete a triangulation during the interview and know all too well what an experience it is.  It is a great equalizer which can rattle or disarm even the most cocky barista.  It can quietly convey that there are always challenges or more to learn in this industry.

I recently talked to a few students doing an article for the Harvard Crimson by walking them through a blind cupping of 'house coffees' around Harvard Sq. Too often, when evaluating a coffee we are heavily influenced by the perception we have of the roaster/shop that produced it and this exercise was about tasting coffees not judging brands or methodology.  It's fair because there is a lot of money and energy put into branding but gems can be missed due to this same bias and brand perception.  What I gained from the exercise with these students is that once you take the brands away, the coffees don't always have that much to say but with the brands attached, the expectation can easily lead the discussion.  I was personally given a bit of validation when the only two single estate coffees on the table were identified immediately (our Bosque at Hi Rise and an El Salvador from Clover Harvard Sq.) by both myself and these self proclaimed coffee illiterates.  Alternatively, it was a bit of a let down in that those were the only two clearly labeled as to what the origin farms were.  It was a tremendous exercise and we'll be doing it again soon.

To organize a good cupping for a small group, we recommend having at least two roasters on a table and enough coffees to have a minimum of 3 (but up to 7 makes for a better challenge).  (we recommend our sampler for aspiring cuppers)  Start with 8 grams of coffee (medium-coarse grind) per 5 ounces of water in each cup.  Use water off boil and pour directly over the grounds.  Let dwell for 4 minutes and then break the crust with a gentle dipping of the spoon at the surface of the cup.  Do not stir or dredge the bottom of the cup.  Afterwards, skim the remaining floating grounds off the cup.

Record the dry ground aromas and make note of any variation between the three cups of each set.  After the water is poured, make note of the hot aroma.  It is best to evaluate the hot aroma a minute in and come back to evaluate it at 3 minutes when it has developed more.  Look for sweetness, cup variations, and distinct (pleasant and unpleasant) aromas.  A critical point is aroma at the break (when the crust is gently disturbed 4 minutes in) as it is the best chance to catch interesting aromas.  Once the surface floaters have been skimmed and the cup has cooled enough to taste, this is the hot cup evaluation.  Roast notes are most prominent here and therefore it's hiding some underlying characters.  Once the cup has cooled considerably, the cold cup evaluation can reveal fruit, acidity, and also defects or roast problems (such as grassy notes, moldy, etc).  A quality roasted coffee will remain similar from dry aroma to cool cup but the flavor characters will become more prominent during each phase.

To set up a good blind cupping, we recommend adhering to a few rules though:
1. Shut up.  There is nothing worse than watching the first person to speak lead the rest towards a set of descriptors or favorites.
2. Let it cool.  Many defects show up in the cool cup and a great hot coffee can really fall apart as it cools.
3.  Keep your notes... yours.  Write it down and stick to what your impressions are.  This is keyed up by following step 1 and documenting everything through in step 2.
4.  Let everyone in.  Don't hog the space, you can always return later.  There is nothing more telling (and distracting) than someone lingering at a particular cup.
5.  Keep the suspense.  Save the reveal until the end and have a good discussion about what was tasted first.

Thursday, December 01, 2011

Limited Release El Bosque Sample Pack!

We are offering a sampler pack online of the regular (12oz) bag of El Bosque lot with a (8oz) bag of the Yellow Bourbon micro lot and a (8oz) bag of the Red Bourbon micro lot. This is a limited offer that will run up to Christmas and incidentally makes a wonderful gift.


Enjoy!