
For brewing with a Hario TCA-2
Before you start:
1. Rinse your filter in hot water and wash with cold water until it runs clear.
If this is a new filter, run through the brewing once without coffee to get rid of the cloth smell.
2. Rinse your Syphon to make sure it's clean. Check for cracks, Dry all exterior and make sure the lower globe is secured.
3. Hook the filter to the top. Make sure it's centered.
4. Pre-boil water in kettle and prepare a cold, damp towel.
5. Place ~35g of beans in the grinder. Run a little bit through to clean up previous grinds.
Heat-up:
1. Fill hot water to the "2" mark on the side of the lower globe. These are little number inside a cup logo near the "hario" mark. (this works both for TCA-2 and TCA-3).
2. Insert upper chamber at an angle into the lower globe. DO NOT seal the top.
Make sure there is a gap for steam to escape.
3. Start your burner and place it in the center of the globe. Set it at max to speed up the heating.
4. Grind the bean into a container/cup. Scoop from the top, 32g of coffee into another cup. I recommend using the cupping cups. They are of nice size. Try to finish this step as close to "drop" as possible, but you can grind/weight before step 1 to avoid messing up.
5. Watch the water in the lower globe start to boil. At the sign of boiling (rapid bubble formation), straighten the top and lightly seat it. Do not "push/seal" the top hard. A very gentle downward pressure is enough. Make sure the top is center and straight.
6. Place the thermometer probe on top, near the bottom of the chamber, away from the center.
Adjust the burner to as low as you can without water falling from the top globe.
7. Watch the temp on top stabilize. There should only be very tiny bubbles and no turbulence. If you have leakage from the side, shift the filter with the stirring paddle until it's sealed. If you cannot get rid of that, start over and re-adjust the filter.
9. If your stabilized temperature is less than 91C, replace the top and increase the heat until it increase to 91C. If the temperature is more than 91C, stir the water on the top w/ your paddle rigorously until it decrease to 91C. (note: 91C is your target brewing temperature. Adjust per degree or roast... see further notes at the end).
10. Get your stirring paddle, coffee, and timer ready to go.
Drop:
1. When water temp stabilizes to 91C, take out the thermometer probe.
2. Hold the coffee on your left hand and stirring paddle on your right.
3. Dump the coffee into the top chamber and immediately start the timer with your pinky finger.
Start your stirring immediately.
1st stir:
Below is my personal technique. You can do whatever you want. Just make sure you do not create any vortex, saturate the coffee completely, and finish your move in 5 sec. The faster the better.
Longer/vortex stir will result in bitterness in the cup...
1. Holding the paddle like a pen with the flat section parallel to the "x-axis" (left-n-right).
Starting on the left most of the "circle", stick the paddle into the coffee.
Move the paddle in a "N" motion (up, down, up) toward the right. You should be able to do 4 "stokes" in about a second.
2. Repeat the motion along the "y-axis" if you felt more agitation is needed.
3.Start from the very top (+Y), "scrape" the side of the top clock-wise 180 degrees.
Repeat the motion counter clock-wise.
If you did the stirring correctly, you should have something like this:
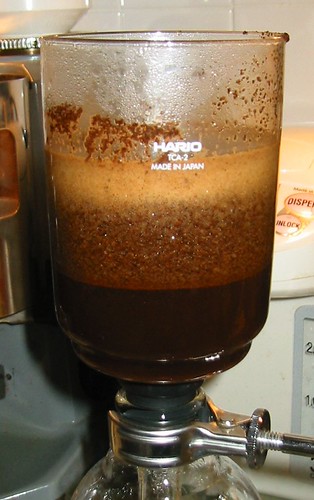
If you do not see the pale "crema" on top, that means your grinds are not fully saturated. Don't be afraid to REALLY stir up the grinds (as long as you don't create a vortex/whirlpool).
Stirring is the hardest part of the whole thing. Takes some practice to get use to. Whatever you do, make sure everything is well mixed, no vortex is created, and do it in 5 seconds.
An Aeropress paddle works REALLY well for stirring ;-)
*Tip about stirring: a lazy rhythmic motion actually works better than fast and violent motion.
Basically you are creating "waves" that crash into each other, mixing the top and bottom layer of the coffee.
2nd Stir:
When the timer hits 30 seconds, do a second stir. Sometimes when the coffee are fresh, it will be really sticky and you will felt like you aren't stirring at all. Make sure you DO stir it well like your first stir. You should see mostly black layers of coffee when you are done.
3rd Stir:
1. At 55 sec mark, turn off the heat and remove the burner from the lower chamber. Stir immediately. When done properly, you should only have a top layer of light-colored coffee of no more than 1/4" (~6 mm) thick. (Note: After your stir, pay attention to how much coffee remained on the top. The thicker the layer is, the less of extraction it got. Work on your stirring if it's the case.)
Draw down:
1. Immediately after 3nd stir, wrap the cold, damp towel on the upper left side of the lower globe near the "neck" (right side is where the handle is). Make sure the wet towel does not touch the lower portion of the bottom globe where the flamed touched.
2. The draw-down should be around 30~50 seconds. Darker roast and higher dose will increase the draw-down time. Longer drawn-down results in continued/over-extraction and will cause bitters in the cup.
Clean up:
1. When the draw-down is complete, wrap the towel with your left hand around the neck of the vacpot (the metal ring); holding the top with your right near the top rim, gently rock the top back and forth until it comes loose. Careful it's a bit hot.
2. Holding the top with your left hand, gently tap the rim downwards with your right to loosen the grinds. Dump the spent coffee and rinse with water.
3. Release the hook and take out the filter. Wash both top and the filter as clean as you can.
4. Place the filter in a small cup of hot water. The water will turn brown immediately. Shake the filter to rinse it for about 10 sec, then rinse with cold water until it run clear. Submerse the filter with clean cold water and store it (outside if you use frequent, in the fridge for longer term storage).
5. Pour the coffee out and rinse the lower globe both inside and out. After some usage, a brown stop might appear near the very bottom. This is most likely dried coffee.
Soaking it in cafiza once in a while takes that right off.
6. Wash your paddle and clean your towel.
Parameters for various methods:
Grind setting:
1. Super Jolly = 24~26 small notches coarser than espresso grind
2. Rocky = 27~30 from true "0" (burrs touching) fineness should be similar to table salt.
Directions for TCA-2/3:
Dark Roast (> Full City):
Temp = 89~90.5C
Dose = 20~30g (28 recommended, decrease if you have a lot of trouble stirring)
Light Roast (< Full City):
Temp = 90.5~92C
Dose = 24~32g (32 recommended)
1st stir = right after drop
2nd stir = @ 30sec
3rd stir = @ 55sec
note 1: temp is measured at the bottom, away from the center of the syphon top.
note 2: keep the stir under 5 seconds. Stir to fully saturate the grinds but not creating a vortex. A zig-zag/cross pattern works well.
note 3: kill the flame right before the 3rd/final stir. The top won't drop down
on you for another couple seconds.
Method II (aroma enhancement):
Roast: City+
Dose: 32g
Temp: 91C
- Same as method 1 but SKIP the 2nd stir @ 30sec.
- Keep the stir under 3 sec if possible
Method II will have thinner extraction compared to method I but preserves aroma.
Works wonders for a certain roast style/bean but under extracts most coffee. Use w/ caution.
Definition for full city is right before 2nd crack to 10 sec into 2nd. City+ is 30~60 sec after 1st ends.
And that is it. I think that is about as detail as I can give without step-by-step photos. Feel free to email with any more questions.
Tips:
- A Zojirushi hot water pot is a great companion to the Syphon (and any manual coffee methods).
- The timer a thermometer probe similar to what was used in the video is great with vacpot (and any manual coffee methods).

